10_分析内核自带的LCD驱动程序_基于IMX6ULL#
分析内核自带的LCD驱动程序_基于IMX6ULL#
参考资料,GIT仓库里:
IMX6ULL\开发板配套资料\datasheet\Core_board\CPU\IMX6ULLRM.pdf《Chapter 34 Enhanced LCD Interface (eLCDIF)》
IMX6ULL的LCD裸机程序
IMX6ULL\source\03_LCD\05_参考的裸机源码\03_font_test
内核自带的IMX6ULL LCD驱动程序
驱动源码:
Linux-4.9.88\drivers\video\fbdev\mxsfb.c设备树:
arch/arm/boot/dts/imx6ull.dtsiarch/arm/boot/dts/100ask_imx6ull-14x14.dts
1. 驱动程序框架#
Linux驱动程序 = 驱动程序框架 + 硬件编程。 在前面已经基于QEMU编写了LCD驱动程序,对LCD驱动程序的框架已经分析清楚。 核心就是:
分配fb_info
设置fb_info
注册fb_info
硬件相关的设置
1.1 入口函数注册platform_driver#
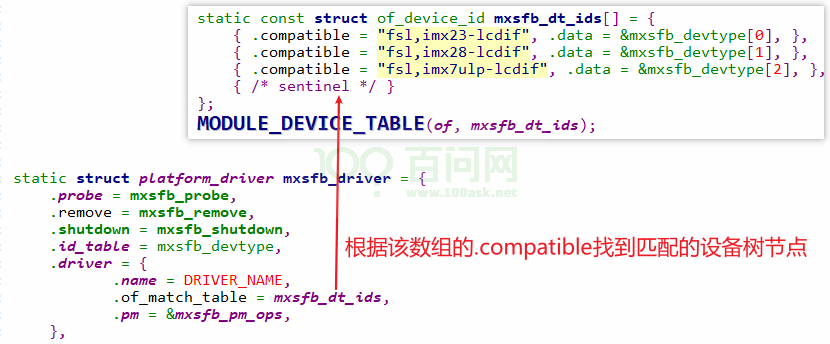
1.2 设备树有对应节点#
1.3 probe函数分析#
2. 编写硬件相关的代码#
我们只需要针对IMX6ULL的编写硬件相关的代码,涉及3部分:
GPIO设置
LCD引脚
背光引脚
时钟设置
确定LCD控制器的时钟
根据LCD的DCLK计算相关时钟
LCD控制器本身的设置
比如设置Framebuffer的地址
设置Framebuffer中数据格式、LCD数据格式
设置时序
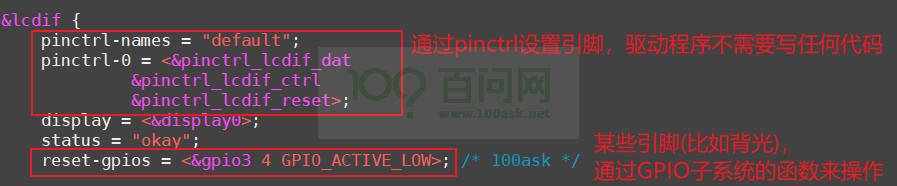
2.1 GPIO设置#
有两种方法:
直接读写相关寄存器
使用设备树,在设备树中设置pinctrl
本课程专注于LCD,所以使用pinctrl简化程序
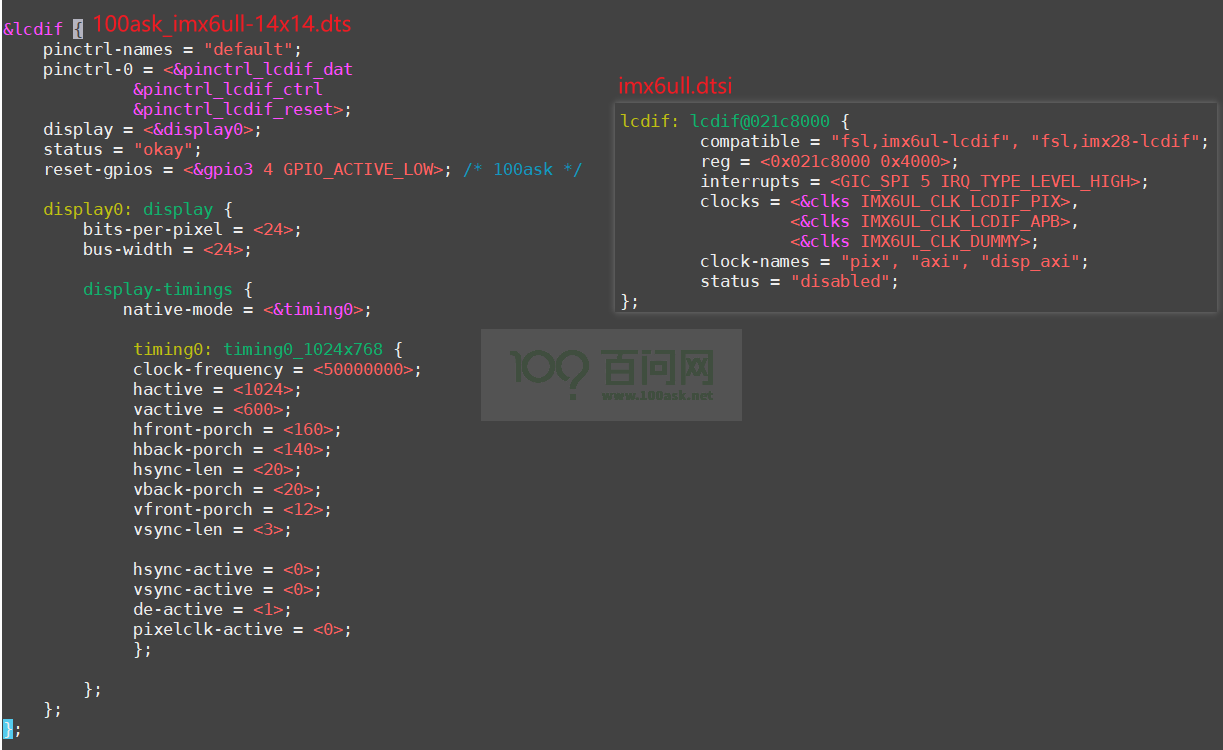
设备树arch/arm/boot/dts/100ask_imx6ull-14x14.dts中:
2.2 时钟设置#
IMX6ULL的LCD控制器涉及2个时钟:

代码里直接使用时钟子系统的代码。
在设备树里指定频率:
文件:arch/arm/boot/dts/100ask_imx6ull-14x14.dts
代码:clock-frequency
       display-timings {
            native-mode = <&timing0>;

             timing0: timing0_1024x768 {
             clock-frequency = <50000000>;
从设备树获得dot clock,存入display_timing
文件:drivers\video\of_display_timing.c
代码:
ret |= parse_timing_property(np, "clock-frequency", &dt->pixelclock);
使用display_timing来设置videomode
文件:drivers\video\videomode.c
代码:
void videomode_from_timing(const struct display_timing *dt,
			  struct videomode *vm)
{
	vm->pixelclock = dt->pixelclock.typ;
	vm->hactive = dt->hactive.typ;
	vm->hfront_porch = dt->hfront_porch.typ;
	vm->hback_porch = dt->hback_porch.typ;
	vm->hsync_len = dt->hsync_len.typ;

	vm->vactive = dt->vactive.typ;
	vm->vfront_porch = dt->vfront_porch.typ;
	vm->vback_porch = dt->vback_porch.typ;
	vm->vsync_len = dt->vsync_len.typ;

	vm->flags = dt->flags;
}
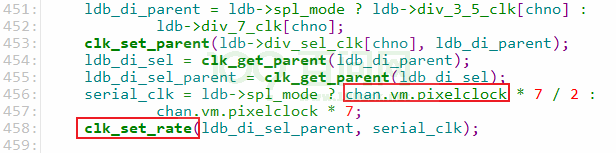
根据videomode的值,使用时钟子系统的函数设置时钟:
文件:drivers\video\fbdev\mxc\ldb.c
代码:
2.3 LCD控制器的配置#
以设置分辨率为例。
在设备树里指定频率:
文件:arch/arm/boot/dts/100ask_imx6ull-14x14.dts
代码:clock-frequency
       display-timings {
            native-mode = <&timing0>;

             timing0: timing0_1024x768 {
				hactive = <1024>;
	            vactive = <600>;
从设备树获得分辨率,存入display_timing
文件:drivers\video\of_display_timing.c
代码:
	ret |= parse_timing_property(np, "hactive", &dt->hactive);
	ret |= parse_timing_property(np, "vactive", &dt->vactive);
使用display_timing来设置videomode
文件:drivers\video\videomode.c
代码:
void videomode_from_timing(const struct display_timing *dt,
			  struct videomode *vm)
{
	vm->hactive = dt->hactive.typ;

    vm->vactive = dt->vactive.typ;
根据videomode的值,设置fb_videomode
文件:drivers\video\fbdev\core\fbmon.c
代码:
int fb_videomode_from_videomode(const struct videomode *vm,
				struct fb_videomode *fbmode)
{
	unsigned int htotal, vtotal;

	fbmode->xres = vm->hactive;

    fbmode->yres = vm->vactive;
根据fb_videomode的值,设置fb_info中的var:
文件:drivers\video\fbdev\core\modedb.c
代码:
void fb_videomode_to_var(struct fb_var_screeninfo *var,
			 const struct fb_videomode *mode)
{
	var->xres = mode->xres;
	var->yres = mode->yres;
根据var的分辨率,设置寄存器
文件:drivers\video\fbdev\mxsfb.c
代码:
	writel(TRANSFER_COUNT_SET_VCOUNT(fb_info->var.yres) |
			TRANSFER_COUNT_SET_HCOUNT(fb_info->var.xres),
			host->base + host->devdata->transfer_count);